|
|
How to track bulk email opens and clicksHow to use Maxprog products Maxprog's Blog |

|

|
How to track bulk email opens and clicks |
Topics | ||||||||
|
How to track bulk email opens and clicks with MLM and install it on your server. MLM stands for Mailing List Manager. To make things simple let's say it is the online part of MaxBulk Mailer. Indeed, it does all that MaxBulk Mailer can't do by itself. MaxBulk Mailer is a desktop application you run when needed and quit once you have finished. MLM is a script you run unattended on your website 24 hours a day, seven days a week, and 365 days a year. As a result, MaxBulk Mailer takes advantage of MLM to perform tasks and offer services that require full-time availability. Imagine you were to maintain your computer with MaxBulk Mailer running indefinitely at home or the office. This is simply inconceivable. Hopefully, you don't have to do that since MLM runs on a web server, and web servers are always running! IMPORTANT NOTE ON SERVER: This blog article and the video below explain how to install MLM on your server. We have designed MLM to run on LAMP web servers (Linux+Apache+MySQL+PHP), a trendy server type. We developed the system initially on Maxprog servers. Whether you don't have a web server or the one you are using gives you problems, you can get a web hosting package at Pair at a very low price. IMPORTANT NOTE ON SUPPORT: MLM has the exact same requirements of WordPress. We offer limited support on the installation when using a server other than Pair.com since most possible issues will come from the server itself, and contacting server support is the path to follow. We can only offer server support for Pair.com since we know the Pair servers. If you have issues with MLM and you don't want to move to a tested server like Pair, you can also open a bulk email account at SMTP2GO. SMTP2GO is a bulk email server that works perfectly with MaxBulk Mailer and offers statistics on its own. What is MLMMaxprog Mailing List Manager (MLM for short) is a double opt-in list subscription manager and a message opening/click-through tracking PHP (v7) script you can install on your website and start using in minutes. MLM supports a complete set of commands you can use either directly in your web browser or with MaxBulk Mailer. In addition, a web interface allows you to log into MLM from your Desktop Computer, iPad, and iPhone.Unlike other products and depending on your possibilities and knowledge, MLM is prepared to work using a MySQL database or simple raw text files. MLM has no limitations, you can create as many lists as you wish with as many subscribers as you need and track the delivery of unlimited messages. We recommend using MySQL for medium to extensive lists and better security. Since MLM is always online and available, your recipients can subscribe or unsubscribe from your mailing lists at any time, either through a one-click link on your message or a web page on your site. MLM has several templates to subscribe to or unsubscribe from. In addition, MLM also allows you to track message opening and link click-through with the help of MaxBulk Mailer (v7 Pro or higher). You just need to activate click-through tracking and send your message with MaxBulk Mailer. Then you can follow all your recipient's actions through the MaxBulk Mailer statistics window. MLM is the ideal solution for getting information about your recipient's behavior. Where can I get MLMMaxBulk Mailer offers MLM at no additional cost. You can freely install it on as many servers as you need as long as all copyright notices and headers remain intact and unmodified in the source. You can install MLM from inside MaxBulk Mailer or manually. We recommend using the built-in installer as explained below, but if you prefer to do it manually, you can download MLM here.How to track bulk email opens and clicksMLM installation is optional, yet it adds two essential services to MaxBulk Mailer. On one hand, it offers the possibility to maintain lists on your website by allowing visitors to subscribe or unsubscribe from any of them. On the other hand, it allows finding out what happens to a message once it leaves your computer and what recipient has opened and clicked on any of the links.MLM fully integrates with MaxBulk Mailer. Once you have installed MLM on your server and set the subscribe page, everything will operate transparently. If you did not have to install MLM to your server, you would never have heard about it. MLM installation and operation are supposed to be easy; actually, they are 99% of the time. Indeed we have worked hard to create MLM and the MaxBulk Mailer built-in FTP installer, making them as easy-to-use and trouble-free as possible. However, the installation will sometimes fail, or MLM will not work as expected. That's because given server settings may be incompatible with MLM or given MLM features. You will likely have to contact your server support in those specific cases to get help. Most of the time, server administrators limit given features arguing security concerns. Anyway, don't give up if you belong to that unlucky 1% group of users with MLM troubles. MLM represents an excellent improvement for MaxBulk Mailer, so it is well worth the effort. There are two ways to install MLM on your server, using the MaxBulk Mailer > Install MLM menu or manually using FTP client software. This tutorial explains how to install MLM on your server using the MaxBulk Mailer built-in installer and how to install MLM manually at the bottom. If you decide to use the built-in installer, you will just have to follow the 5 steps below: Step #1 - MLM Settings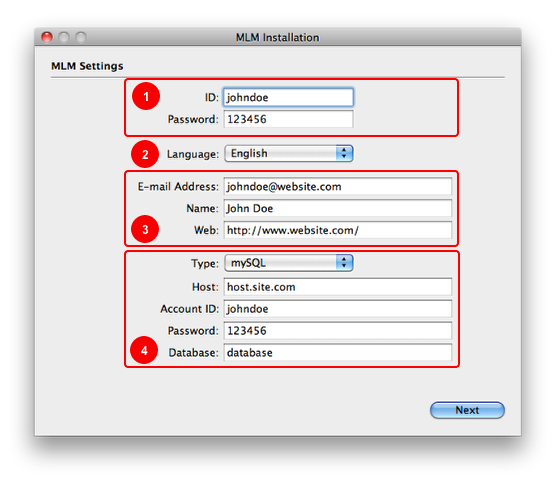 This step is all about MLM settings. There are four groups of settings numbered 1 to 4. Note that the data used in the screenshot above is just an example. You have to use your own. Whether you don't have a web server or the one you are using gives you problems, you can get a web hosting package at Pair at a very low price. 1.- Your MLM User ID and Password: Choose whatever you prefer here! This data is to protect the MLM access. MaxBulk Mailer will need this data to access MLM. If you access MLM directly with your Web Browser, you will need this data. 2.- Default Language: MLM will use this language by default to display responses, errors, and so on. It will also be the language used for sending emails to the recipient. 3.- Your data: It will be displayed on all MLM pages and added to all email messages. In addition, MLM will send all administrative messages and errors to 'E-mail Address'. 4.- Data storage: First select how you want data to be stored, MySQL or Plain Text. If you select 'Plain Text,' you are finished with this step. Just click on the 'Next' button. If you select 'MySQL,' you must type all your server data below: the server host address. It can be 'localhost,' an IP address like '186.412.88.10', or a server address like 'mysql.mydomain.com'. Then enter your account ID and your password. Finally, the Database you want to use to store the data. Note that you have to use a full-access MySQL account that allows you to create tables! If you don't have any database created, just select a name, and MLM will create it for you. It is highly recommended to use MySQL! Once you have finished click on the Next button. Step #2 - FTP Server Settings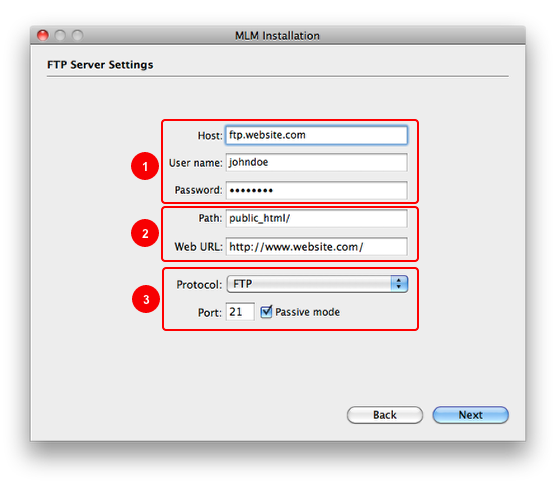 You have to install MLM on your web server. The common way to transfer files to a web server is using the FTP protocol. It is the same protocol used by your favorite FTP client software such as FTP Disk, Transmit, Fetch or Core FTP. 1.- Server address, User ID, and Password: You must provide your FTP server address, user ID, and password. Most of the time, your FTP server will be in the form 'ftp.my website.xxx'. This is the same address, user ID, and password you use with the FTP software you use to upload your HTML pages to your site! 2.- FTP path and Web URL: Sometimes public HTML files must be placed into a special directory on your server. It can be labeled 'public', 'html', 'public_html', 'web', 'www' or 'httpdocs'. Perhaps there is no such folder. You should know that since you already uploaded files to your server. Just check and type the public folder here, if any. The Web URL is the web address of the site corresponding to your FTP account. MLM uses the FTP path and the Web URL fields to generate the MLM script link. If you make an error, that link will be wrong. You can edit it anytime from the MaxBulk Mailer preferences, second panel. More information on this is in step #5. 3.- FTP connection settings: Those settings are here just in case you need to use a different port, a secure protocol, or active mode instead of passive. Default settings should be fine, though. Once you have finished click on the Next button. You will connect to your FTP server if all the data is correct. Step #3 - Destination folder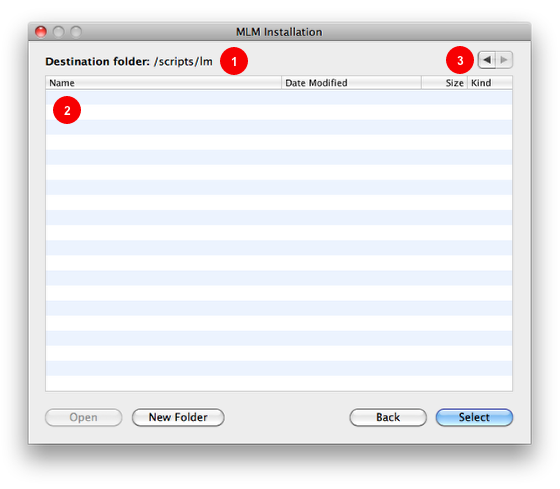 Select the folder where you want to install MLM as soon as you are connected. 1.- Destination folder: You can see where MLM is about to be installed. It will default be in a folder labeled 'lm,' inside the folder you select, if any. In this example, we have created a folder named 'scripts.' You can, of course, install MLM directly in your root folder. 2.- Folder contents: As with any FTP tool, you will see the list of files on the selected folder. In this case, it is empty since we just created the script folder. 3.- Browsing buttons: You can use those buttons to go back and forward through your server folders. You can also use the Open button to open a folder (same as double-clicking) and the New Folder to create a new folder in the current directory. Once you have finished, click the Select button to select the destination folder and start the installation. Step #4 - MLM Installation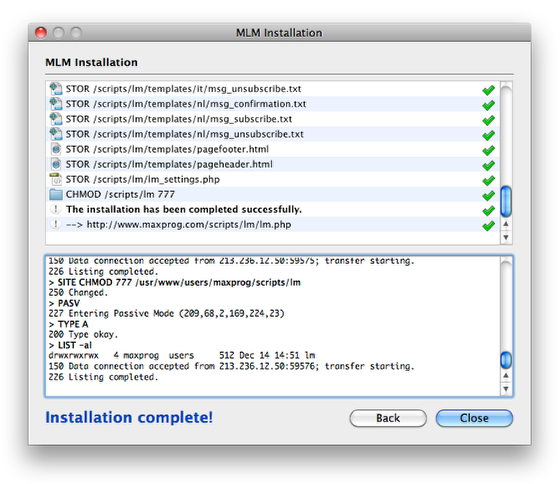 You will see the detailed progress and FTP log below during the installation. The installer will upload all the MLM files to your server, then it will set the 'lm' folder permissions to 777. If everything goes well, you will end with a blue 'Installation complete' message and a grey checkmark on each line. If something goes wrong, you will get a red error message and a red cross on the line that has produced the error. You can try to install it again by clicking on the Back button. If the error persists, you will have to install MLM manually, as explained at the end of this tutorial. Once you have finished click on the Close button. Note that the MaxBulk Mailer built-in installer tries to set the 'lm' folder privileges/permissions to 777. On failure, it will try 775, 755, and 705. 777 used to work with most servers but not all. If you try to log into MLM with your browser using the lm.php URL (ex, https://www.yourdomain.com/pathtomlm/lm.php) and you get an 'Internal server Error,' which means your server doesn't like the current permissions just CHMOD the 'lm' folder to 777 manually and try again. If it also fails, CHMOD, the 'lm' folder to 775, 755, or 705. It should then work. You can CHMOD a folder with your FTP software. For example with FTP Disk connect to your server, select the 'lm' folder and either click on the 'Get Info' menu or use the Cmd-I on Mac OS or Ctrl-I on Windows. You will get a window with the file permissions at the bottom. Write the new number next to 'Unix:' and click on 'Apply.' That's all! Step #5 - Checking the MLM URL in MaxBulk Mailer preferences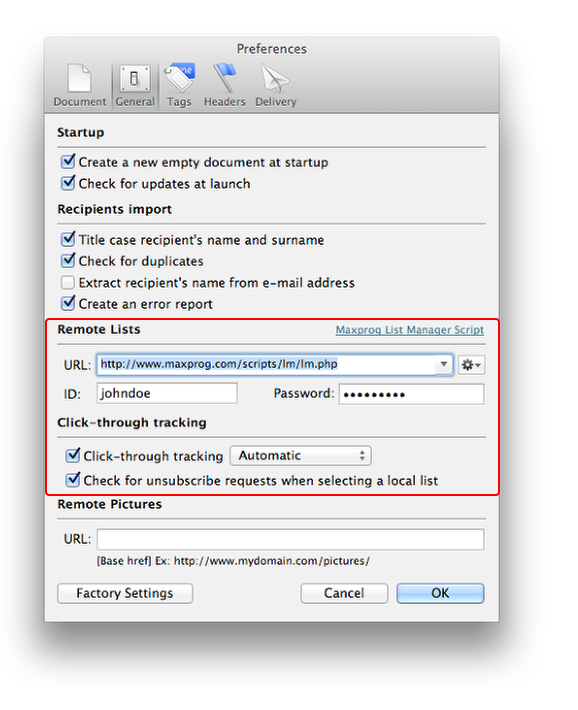 Now go to the MaxBulk Mailer preferences, second panel 'General'. Make sure the MLM URL is correct. You can check with your browser by clicking the 'Tool' button next to the MLM URL and selecting 'Web Interface' (or copy and paste or drag and drop the URL to your favorite browser). You should get the MLM Login screen. Check the 'Click-Through tracking' option if you plan to do tracking. You can also check whether the installer has installed MLM and is operating correctly by running the diagnostics (Tool button > Diagnose) or logging into it with the ID and password you entered at the beginning of the installation. Go to 'Lists', try to create a test list, and try to add a recipient to that list. Check your server's '../lm/lm_settings.php' file if you get an error. It is the file the installer has created with all the settings you have provided. For example you can use FTP Disk to connect to your server, open the 'lm' folder, select 'lm_settings.php' and click on the 'Edit' button. That will open the file. You can edit it and save the changes like with a regular text editor, the only difference is that the changes will be saved directly to the file on the remote server. Another way to check if you have installed MLM properly is to run a diagnostic manually on your browser. Use the following command: lm.php?cmd=diagnose&pwd=YOUR_MLM_PASSWORD The Statistics - Message opening and click-through trackingYou will access the message opening and click-through tracking window by clicking on the MaxBulk Mailer 'Statistics' toolbar or selecting the Delivery > Statistics menu. MaxBulk Mailer displays your deliveries, delivery number, and the message subject by similar consecutive subjects on the left side. The statistic entries and the summary are at the bottom on the right side. You must check one or more deliveries to see the corresponding statistics. Just selecting a delivery does nothing. The list displays all recipient actions, by default, opening, and clicks. Use the actions pull-down menu to display more specific info (only opened messages, only the click on links, the unsubscribed, or the bounces). An opening action is when the recipient opens your message in its email reader application. A click action is when the recipient clicks on a link in that message. A recipient may open your message more than once by scrolling through its message list. He can also click more than once on the same link. MaxBulk Mailer groups duplicate actions. The unsubscribe action is when a recipient has clicked on your message Unsubscribe link, and its address has been removed or unsubscribed from your list. Bounces are delivery errors, they are added to MLM by using eMail Bounce Handler. This window updates itself automatically every 60 seconds. However, clicking on the 'Preference' toolbar button can change that to whatever you like. The 'Update Now' button forces that refresh. The 'Refresh' toolbar button reloads the Delivery list. Furthermore, you can even export the information to a file using the toolbar Export button. Remote Lists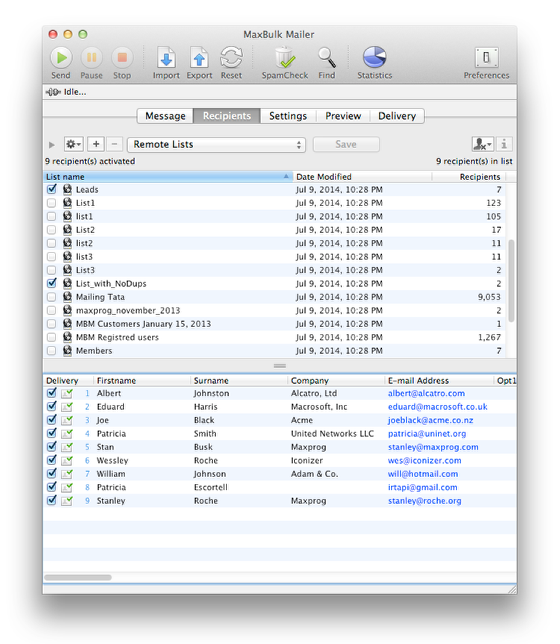 You can access all your MLM remote lists by selecting the 'Remote Lists' from the list pull-down menu. Remote lists can be created by directly uploading them to MLM thru the Recipients > Upload to MLM menu or using a subscription page on your website. The 'lm/html' folder includes a few sample pages for subscribing customers to your lists (to a fixed single list, a single list from a selection, or multiple lists at once) and a sample page for uploading lists to MLM (despite you can already do that from MaxBulk Mailer ). The 'lm/html' folder contents: - subscribe-auto-multiple.php: Sample subscription page with a form that automatically displays all your MLM lists with check boxes (Example) - subscribe-auto-single.php: Sample subscription page with a form that automatically displays a pull-down menu containing all your MLM lists (Example) - subscribe-multiple.php: Sample subscription page where you can set what lists to display with check boxes - HTML modifications required! (Example) - subscribe-single-fixed.php: Sample subscription page where you can subscribe to one unique implicit list (HTML modifications required) or adding the list name as a parameter: &list=mylist (Example) - subscribe-single-selection.php: Sample subscription page where you can set what lists to display in a pull-down menu- HTML modifications required (Example) - upload-list.php: Page you can use to upload lists to MLM (Example) Unsubscribe pageNote that there is no sample page for the unsubscribe action. There is no need for it. Just add the [Unsubscribe] tag to your message, and MaxBulk Mailer will create the appropriate link for you. You can edit the substitution text for that tag on the MaxBulk Mailer preferences, Tags panel, at the bottom. By default, it is 'here'. For instance, if you add this to your message: "If you don't want to receive messages from us, just click [Unsubscribe]." you will read: "If you don't want to receive messages from us just click here.", "here" being a link to the MLM unsubscribe script.You can use the sentence you like with the preferred substitution word or sentence. The link will always allow the recipient to unsubscribe from your list. You can modify the MLM unsubscribe behavior by editing the lm_prefs.php file. You can tell MLM to keep unsubscribe addresses in the list, ask for a confirmation or send (or not) a confirmation email. The MLM web interface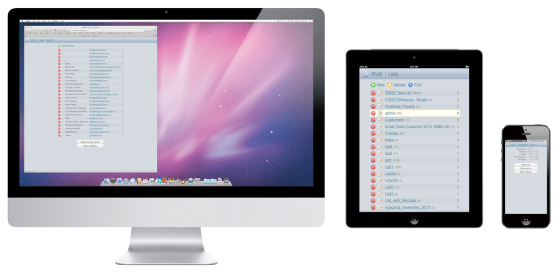 As shown above, you can access your remote lists and delivery statistics using the built-in MLM Web Interface from your Desktop Computer, notebook, iPad, and even your iPhone. The interface will resize automatically. This interface allows you to access your delivery statistics and create and modify your lists. Use the lm.php URL on the device web browser to access this interface. That will show a login screen. Enter your MLM user ID and password. Installation Errors - How to install MLM manuallyWhen you get errors during the installation, the best will be to install the software manually. You can do that with a FTP software like FTP Disk, Transmit, Fetch, CoreFTP... First download the very last MLM release here: https://www.maxprog.com/goodies/mlm_pro_php.zip. This how you have to proceed:1.- Open the lm/lm_settings.php file with a text editor (Notepad on Windows or free TextWrangler on Mac OS). 2.- Edit the script settings and save (each setting is explained in the file). [1] 3.- Upload the 'lm' folder to your FTP server (in your public folder). [2] 4.- Use your FTP software to CHMOD the 'lm' folder to 777 (775, 755 or 705). [3] 5.- Enter the 'lm.php' full URL and your user ID and password to MaxBulk preferences. 6.- If you have selected to use MySQL, run the script with the 'Init' command: https://<script_path_here>/lm.php?cmd=init&pwd=password [1] The lm/lm_settings.php contains all the parameters you can change to customize the script to match your needs. When you perform a manual installation, it is essential to open that file with a plain text editor like Notepad on Windows or BBEdit on macOS. [2] Never upload MLM to your home root folder if you have a specific folder for public HTML documents like 'public', 'html', 'public_html', 'web', 'www', 'httpdocs'. Just open the folder or any subfolder first! [3] You can CHMOD a folder with your FTP software. For exemple, with FTP Disk just connect to your server, select the 'lm' folder. Then either click on the 'Get Info' menu or use the Cmd-I on Mac OS or Ctrl-I on Windows. You will get a window with the file permissions at the bottom. Write the new number next to 'Unix:' and click on 'Apply.' Note that the 777 permissions work with most servers. However, it's possible your server doesn't allow 777. You will get an FTP error as soon as you change the permissions. You can also get an HTTP 'Internal Server Error' when you try to run MLM with your browser. In such cases, try 775, 755, or 705. If your web server gives you problems, you can get a web hosting package at Pair at a very low price. Checking if MLM has been properly installedYou can check whether MLM has been installed and is operating correctly. The easiest way is to run the diagnostics from the MaxBulk Mailer preferences second panel (Tool button > Diagnose). However, you can also log into MLM with your browser using your MLM ID and password (Tool button > Web Interface). Go to 'Lists,' try to create a test list, and try to add a recipient to that list. To log into MLM manually with your browser, just use the full lm.php URL. Finally, another way to check if you have installed MLM correctly is to run the diagnostic directly on your browser. Use the following command:lm.php?cmd=diagnose&pwd=YOUR_MLM_PASSWORD If you get MySQL connection errors, it is very likely because your MySQL settings stored in the lm/lm_settings.php file are wrong, especially the server address. Try 'localhost' or the server IP address. MLM seems installed correctly, but you don't get any stats?To get statistics with MaxBulk Mailer and MLM, you need to:- Enter the right MLM URL in the MaxBulk Mailer preferences (starting with https:// and ending with lm.php). - Enter the proper MLM credentials in the MaxBulk Mailer preferences (MLM User ID and Password). - Activate Click-through tracking in the MaxBulk Mailer Preferences. - Activate the Singly option in the MaxBulk Mailer Settings panel. (What is the 'Singly' option for?) - Send your message as Styled Text or HTML (no opening tracking for Plain Text emails, only click-through) Note about using the MaxBulk Mailer MLM built-in installerThe MaxBulk Mailer MLM built-in installer is supposed to enter the right MLM URL, the proper credentials, and settings for you based on your inputs. However, if you make a mistake when filling the installation window, you will get that same mistake in the MaxBulk Mailer preference panel.As a result, if you have problems, check the MLM URL in the MaxBulk Mailer preferences (second panel from the left). The URL has to be the full URL of the MLM main file, starting with HTTPS:// and ending with lm.php. Look at the MaxBulk Mailer Settings panel, is the Singly option checked? It should! Look at the MaxBulk Mailer message panel, is the format appropriately set? If you select Plain Text, you will not get opening stats. That format is the only one that is limited to click-through tracking only. Is the message arriving in the Inbox, not the spam box? Messages flagged as spam/junk will only generate click-through stats, no opening stats. On the MaxBulk Mailer Statistics window, check the right delivery list on the left side. Indeed MaxBulk Mailer will only show the statistics of the checked deliveries. You can check as many as you want. Selecting/highlighting a delivery is useless, you have to check it! SummaryWith MaxBulk Mailer and MLM, you can track bulk email opens and clicks. The two integrates perfectly. Just a matter of installing MLM on your web server. If you have questions, please write it below. MLM is quite a complete package since it includes everything you need, from list handling, opening, and click-through tracking to double opt-in subscription handling.In addition, and as you have read above, MaxBulk Mailer also includes an installer. And above all, it is free for MaxBulk Mailer registered users. In other words, you have to try it. Related post: How to add an unsubscribe link to your messages IMPORTANT NOTE ON SERVER: This blog article and the video below explain how to install MLM on your server. We have designed MLM to run on LAMP web servers (Linux+Apache+MySQL+PHP), a trendy server type. We developed the system initially on Maxprog servers. Whether you don't have a web server or the one you are using gives you problems, you can get a web hosting package at Pair at a very low price. IMPORTANT NOTE ON SUPPORT: MLM has the exact same requirements of WordPress. We offer limited support on the installation when using a server other than Pair.com since most possible issues will come from the server itself, and contacting server support is the path to follow. We can only offer server support for Pair.com since we know the Pair servers. If you have issues with MLM and you don't want to move to a tested server like Pair, you can also open a bulk email account at SMTP2GO. SMTP2GO is a bulk email server that works perfectly with MaxBulk Mailer and offers statistics on its own.
|
|||||||||
